Adobe AIR provides a consistent platform for desktop and mobile apps. While consistency is very important there are times when developers need to extend beyond the common APIs. This article will walk you through how to integrate AIR for Android applications with other native APIs and functionality in the Android SDK. It covers three common use cases for native extensibility: System Notifications, Widgets, and Application Licensing.
If you’d like to follow along you will need the following prerequisites:
1. Adobe Flash Builder 4.5(which includes the Flex 4.5 SDK and AIR 2.6 SDK)
2. Android SDK
Before getting started, a little background will help. Android applications are distributed as APK files. An APK file contains the Dalvik executable (dex), which will run on an Android device inside the Dalvik VM. The Android SDK compiles a Java-like language to dex.
AIR for Android applications are also distributed as APK files. Inside of these APK files is a small bit of dex that bootstraps the AIR for Android runtime, which then loads and runs the SWF file that is also inside of the APK. The actual dex class that bootstraps the AIR application is dynamically generated by the adt tool in the AIR SDK. The class is named AppEntry and its package name depends on the AIR application ID, but it always begins with “air”. The AppEntry class checks for the existence of the AIR runtime and then launches the AIR application. The Android descriptor file in an AIR APK specifies that the main application class is the AppEntry class.
To extend AIR for Android applications to include native APIs and Android SDK functionality, you start by creating a SWF file using Flex and then copy that SWF file, the dex classes for AIR for Android, and the required resources into a standard Android project. By using the original AppEntry class you can still bootstrap the AIR application in the Android project but you can extend that class to gain a startup hook.
1. To get started, download a package with the required dependencies for extending AIR for Android:
download here extending_air_for_android-flex_4_5-air_2_6-v_1.zip
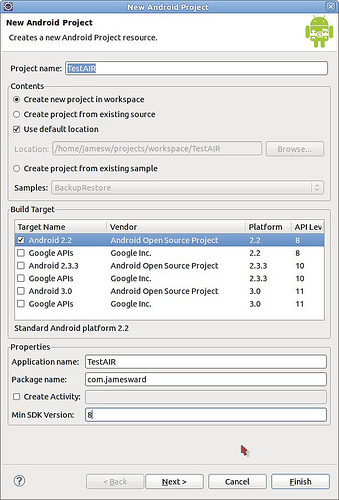
2. Next, create a regular Android project in Eclipse (do not create an Activity yet):
3. Copy all of the files from the zip file you downloaded into the root directory of the newly created Android project. You will need to overwrite the existing files and update the launch configuration (if Eclipse asks you to).
4. Delete the “res/layout” directory.
5. Add the airbootstrap.jar file to the project’s build path. You can do that by right-clicking on the file, then select Build Path and then Add to Build Path.
6. Verify that the project runs. You should see “hello, world” on your Android device. If so, then the AIR application is properly being bootstrapped and the Flex application in assets/app.swf is correctly being run.
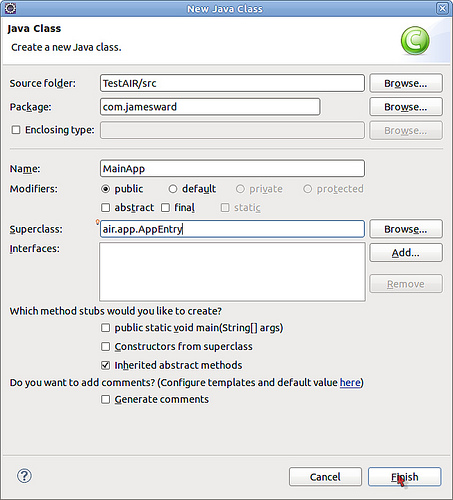
At this point if you do not need any custom startup hooks then you can simply replace the assets/app.swf file with your own SWF file (but it must be named app.swf). If you do need a custom startup hook then simply create a new Java class named “MainApp” that extends the air.app.AppEntry class.
7. Override the onCreate() method and add your own startup logic before super.onCreate() is called (which loads the AIR app). Here is an example:
1 2 3 4 5 6 7 8 9 10 | package com.jamesward; import air.app.AppEntry; import android.os.Bundle; public class MainApp extends AppEntry { @Override public void onCreate(Bundle arg0) { System.out.println("test test"); super.onCreate(arg0); } } |
package com.jamesward;
import air.app.AppEntry;
import android.os.Bundle;
public class MainApp extends AppEntry {
   @Override
   public void onCreate(Bundle arg0) {
       System.out.println("test test");
       super.onCreate(arg0);
   }
}8. Open the AndroidManifest.xml descriptor file and tell it to use the new MainApp class instead of the original AppEntry class. First change the package to be the same as your MainApp’s package:
<manifest package="com.jamesward" android:versionCode="1000000" android:versionName="1.0.0"
  xmlns:android="<a href="http://schemas.android.com/apk/res/android">http://schemas.android.com/apk/res/android</a>">
Also update the activity to use the MainApp class (make sure you have the period before the class name):
<activity android:name=".MainApp" ...>
You can also add any other permissions or settings you might need in the AndroidManifest.xml file.
9. Save the changes and, when Eclipse prompts you, update the launch configuration.
10. Run the application and you should again see “hello, world”. This time, however, in LogCat (command line tool or Eclipse view) you should see the “test test” output. Now that you have a startup hook, you can do some fun stuff!
原文作者:James Ward


Hi my friend!
I can see this website is very interesting. Let me inrtoduce the unique system where you can buy money for less money! Interesting? Press the link -> http://us.dubli.com/tus193545
Great blog, how about links exchanging? Please contact me asap, Thanks.