Android动画设计之ViewOverlay
什么是ViewOverlay?
ViewOverlay is a class that we can find in Android since its version 4.3 (API version 18) that provides a transparent layer on top of a View
, to which you can add visual content and that does not affect the layout hierarchy.
It always has the same size and position as its host view, allowing you to add content over that view.
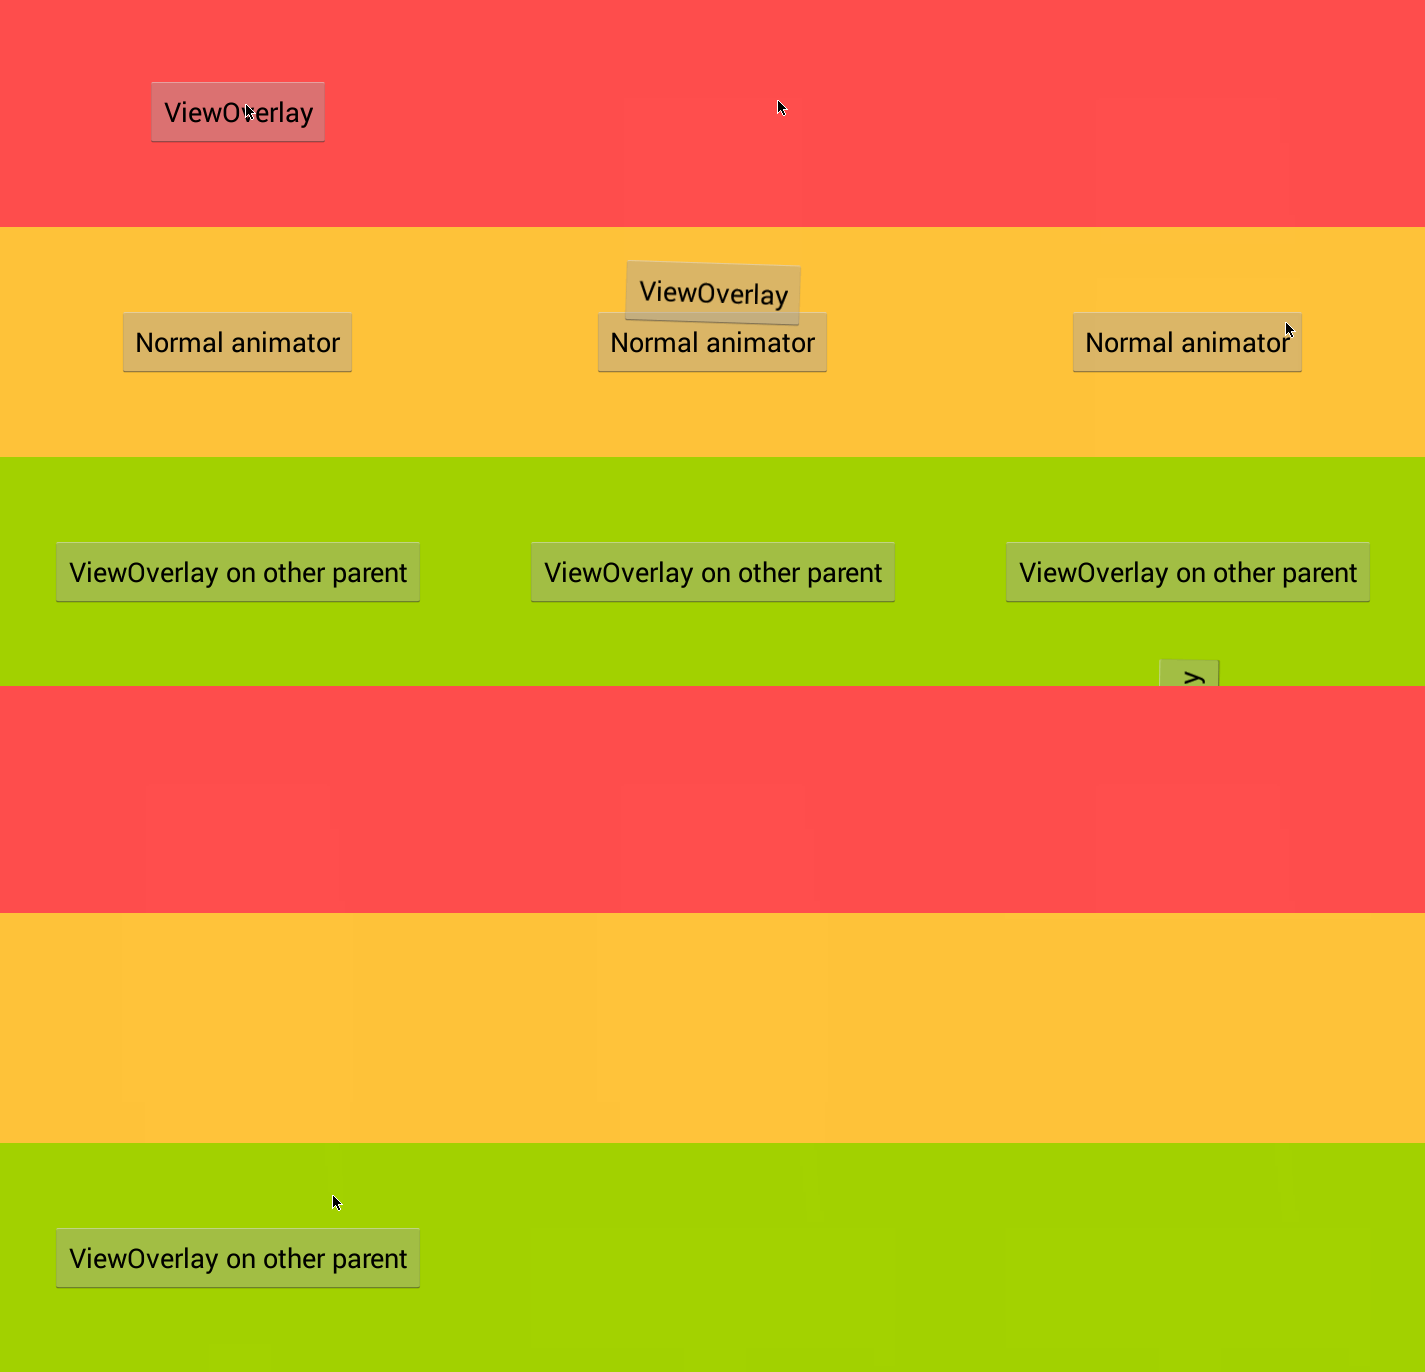
运行效果
红色部分:使用了按钮的 parent-parent layout (the main, first-level, layout) ViewGroupOverlay,所以可以穿越整个画面。
橙色部分:没有使用ViewOverlay技术,所以按钮的动画只限定于它的父窗口部分。
绿色部分:结合使用了两种技术,首先是渐变消失,alpha animation from 1f to 0f,然后放在橙色 non-parent ViewOverlay (the orange layout)中,后段动画仅限制与橙色部分。
使用方法
You just have to call the getOverlay() method from any View of your app to get its ViewOverlay, or a ViewGroupOverlay if you are calling this method from some ViewGroup object, but both of them uses the same concept.
Once you got it, you can add any View or Drawable that you want to show in this overlay calling add(Drawable drawable) method on ViewOverlay, or add(View view) on ViewGroupOverlay.
ViewOverlay API is so simple, aside from add(Drawable drawable), we can also find clear() and remove(Drawable drawable)
. These are the only methods that we have to use to handle the views that we move to our ViewOverlays.
优势
Well, for now everything that I came up to my mind to do with this new API can be done using RelativeLayout and a bit of tricky & ugly code. But this lets us to do that things in a friendly way.
Essentially,this component is visual-only
, so views attached to a ViewOverlay will not respond to any touch or tap event. ViewOverlay mechanism was conceived to be used combined with stuff like animations.
Using ViewOverlays we can animate views through other layouts in view hierarchy, even if they are not any of its parents.
So when some of these animations ends, we should have to call clear() or remove(Drawable drawable)
methods, to remove the view from our ViewOverlay to keep it clean and avoid memory leaks.
使用限制
Yeah, but…
- This isonly for API 18+, although we hope it will be backported at some support library in the near future.
- Right now, there is not a single example.
We can not do anything to solve the first point, but today we have been playing with this new stuff to try to understand how it works. So…
程序源码
- 界面布局 activity_main.xml
<LinearLayout xmlns:android="http://schemas.android.com/apk/res/android"
xmlns:tools="http://schemas.android.com/tools"
android:layout_width="match_parent"
android:layout_height="match_parent"
android:orientation="vertical"
tools:context=".MainActivity" >

<FrameLayout
android:id="@+id/redContainer"
android:layout_width="match_parent"
android:layout_height="0dp"
android:layout_weight="1"
android:background="@android:color/holo_red_light" >

<Button
android:id="@+id/button"
android:layout_width="wrap_content"
android:layout_height="wrap_content"
android:layout_gravity="center"
android:text="ViewOverlay" />
</FrameLayout>

<FrameLayout
android:id="@+id/greenContainer"
android:layout_width="match_parent"
android:layout_height="0dp"
android:layout_weight="1"
android:background="@android:color/holo_orange_light" >

<Button
android:id="@+id/button2"
android:layout_width="wrap_content"
android:layout_height="wrap_content"
android:layout_gravity="center"
android:text="Normal animator" />
</FrameLayout>

<FrameLayout
android:id="@+id/orangeContainer"
android:layout_width="match_parent"
android:layout_height="0dp"
android:layout_weight="1"
android:background="@android:color/holo_green_light" >

<Button
android:id="@+id/button3"
android:layout_width="wrap_content"
android:layout_height="wrap_content"
android:layout_gravity="center"
android:text="ViewOverlay on other parent" />
</FrameLayout>

</LinearLayout>
- MainActivity.java
package cat.lafosca.viewoverlaytest;

import android.animation.Animator;
import android.animation.Animator.AnimatorListener;
import android.animation.AnimatorSet;
import android.animation.ObjectAnimator;
import android.app.Activity;
import android.os.Bundle;
import android.view.Menu;
import android.view.MenuItem;
import android.view.View;
import android.view.View.OnClickListener;
import android.view.ViewGroup;
import android.view.animation.Animation;
import android.widget.Button;

public class MainActivity extends Activity {

	@Override
	protected void onCreate(Bundle savedInstanceState) {
		super.onCreate(savedInstanceState);
		viewsSetup();
	}

	private void viewsSetup() {
		setContentView(R.layout.activity_main);

		final Button button = (Button) findViewById(R.id.button);

		button.setOnClickListener(new OnClickListener() {

			@Override
			public void onClick(View arg0) {
				// Our button is added to the parent of its parent, the most top-level layout
				final ViewGroup container = (ViewGroup) button.getParent().getParent();
				container.getOverlay().add(button);

				ObjectAnimator anim = ObjectAnimator.ofFloat(button, "translationY", container.getHeight());
				ObjectAnimator rotate = ObjectAnimator.ofFloat(button, "rotation", 0, 360);
				rotate.setRepeatCount(Animation.INFINITE);
				rotate.setRepeatMode(Animation.REVERSE);
				rotate.setDuration(350);

				/*
				 * Button needs to be removed after animation ending
				 * When we have added the view to the ViewOverlay,
				 * it was removed from its original parent.
				 */
				anim.addListener(new AnimatorListener() {

					@Override
					public void onAnimationStart(Animator arg0) {
					}

					@Override
					public void onAnimationRepeat(Animator arg0) {
					}

					@Override
					public void onAnimationEnd(Animator arg0) {
						container.getOverlay().remove(button);
					}

					@Override
					public void onAnimationCancel(Animator arg0) {
						container.getOverlay().remove(button);
					}
				});

				anim.setDuration(2000);

				AnimatorSet set = new AnimatorSet();
				set.playTogether(anim, rotate);
				set.start();
			}
		});

		final Button button2 = (Button) findViewById(R.id.button2);
		button2.setOnClickListener(new OnClickListener() {

			@Override
			public void onClick(View arg0) {
				// Normal animation, we only see it when is animating in its original layout container.
				final ViewGroup container = (ViewGroup) button2.getParent().getParent();
				ObjectAnimator anim = ObjectAnimator.ofFloat(button2, "translationY", -container.getHeight());
				anim.setDuration(2000);
				anim.start();
			}
		});

		final Button button3 = (Button) findViewById(R.id.button3);
		button3.setOnClickListener(new OnClickListener() {

			@Override
			public void onClick(View arg0) {
				ObjectAnimator fadeOut = ObjectAnimator.ofFloat(button3, "alpha", 1f, 0f);
				fadeOut.setDuration(500);

				/*
				 * Here we add our button to center layout's ViewGroupOverlay
				 * when first fade-out animation ends.
				 */
				final ViewGroup container = (ViewGroup) button2.getParent();
				final ObjectAnimator anim = ObjectAnimator.ofFloat(button3, "translationY", -container.getHeight() * 2);
				anim.setDuration(2000);

				anim.addListener(new AnimatorListener() {

					@Override
					public void onAnimationStart(Animator animation) { }

					@Override
					public void onAnimationRepeat(Animator animation) { }

					@Override
					public void onAnimationEnd(Animator animation) {
						container.getOverlay().remove(button3);
					}

					@Override
					public void onAnimationCancel(Animator animation) {
						container.getOverlay().remove(button3);
					}
				});

				fadeOut.addListener(new AnimatorListener() {

					@Override
					public void onAnimationStart(Animator arg0) {
					}

					@Override
					public void onAnimationRepeat(Animator arg0) {
					}

					@Override
					public void onAnimationEnd(Animator arg0) {
						container.getOverlay().add(button3);
						button3.setAlpha(1f);
						anim.start();
					}

					@Override
					public void onAnimationCancel(Animator arg0) {
						container.getOverlay().add(button3);
						button3.setAlpha(1f);
						anim.start();
					}
				});

				fadeOut.start();
			}
		});
	}

	@Override
	public boolean onCreateOptionsMenu(Menu menu) {
		getMenuInflater().inflate(R.menu.main, menu);
		return true;
	}

	@Override
	public boolean onOptionsItemSelected(MenuItem item) {
		if (item.getItemId() == R.id.action_reset) {
			viewsSetup();
		}
		return super.onOptionsItemSelected(item);
	}

}
完整代码下载:You can download and check our project from right here.
参照文章:http://www.lafosca.cat/viewoverlay-in-android/
加入讨论
新评论 — 条评论保存在本站自托管服务里,无需注册登录,填个昵称就能留言;不依赖任何第三方 Cookie 或账号。请尽量说点有用的 :)